
3D Printing a Warhammer Army: From Files to Tabletop

Hello everyone and welcome back to another blog!
This time we're going to be looking at what's important to consider when printing armies!
So, what actually is important when approaching a fully 3D printed army for certain games? Like, for example, if someone wanted something for Age of Sigmar by some odd chance...
3D printing lets you get models that are specific to the look, theme or style that you may want, but it's not always as easy as it sounds.
I've printed a fair few things in my time, and some of that has also been fully 3D printed armies for tabletop wargames.
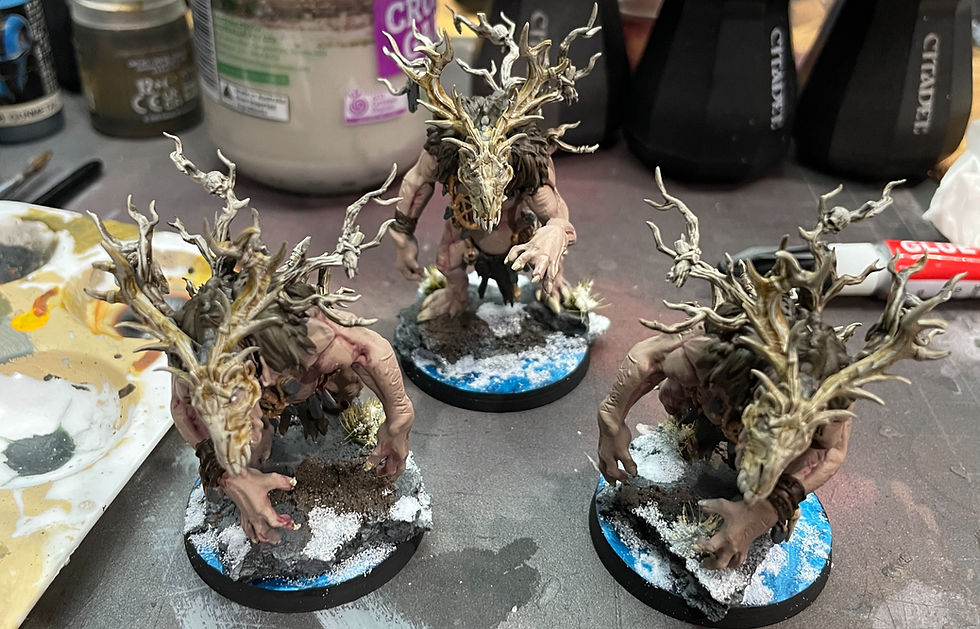
Most recently, it was some Ogres for a popular tabletop game for myself.
So let's dive in and give you a bit of perspective on how I like to approach finding files and preparing those files to make them a cohesive army for the tabletop.
First things first: What kind of 3D printed Warhammer army are you looking for?
This doesn't necessarily mean you need to know the exact file or model you're after. You need to know the vibe.
If you're just trying to print a supplemental unit for an existing army, it's a lot easier to find something that slots in. But if you're going for a full 3D printed army, like I have done, it's a lot harder to find a creator that has a big enough catalogue to cover all the unit types you need.
And this is where a surprising amount of the work comes in.
Most of my time on a project like this is actually research. Looking for files, checking out different designers, comparing options and trying to work out what will actually make sense as a complete army and match intended unit design/battlefield role.
If you're looking at 3D printing a Warhammer 40K army or an Age of Sigmar army, this is something worth considering before you start buying files.
You don't necessarily want every model to look identical, but you do want the army to look like it belongs together.
For me, the best places to start looking are MyMiniFactory and Cults3D, where you can find a huge variety of 3D printable tabletop miniatures and alternative sculpts.
Finding the right files for a 3D printed army
I got pretty lucky here and found a designer that had most of what I needed for the army list I wanted to run.
That's a pretty ideal situation.
Once you've purchased the files, though, it's then onto the prep stage.
And this is where things can get interesting.
A common issue that you'll run into with different designers is scale, or simply the size of the model itself.
This can become particularly noticeable when you're building an army using files from multiple designers.
Some models might be slightly too large, some slightly too small, and some might have been designed around completely different assumptions about what size the finished miniature should be.
In my case, pretty much everything needed to be resized to fit the purpose it was needed for.
There's an easy trick to make sure you get it close enough to what you're after, but the hard part is that when you're re-scaling or re-sizing files, the pre-supported options are likely not going to be usable anymore.
Which means manual supporting.
Getting the scale right
The trick to making sure everything is going to come out at the size you need is actually pretty simple.
Put a base of the appropriate size in your slicer and move the model onto that.
That gives you a digital recreation and reference of the actual size you're working with, rather than simply eyeballing it.

This is particularly useful when you're trying to build an entire 3D printed Warhammer army, because consistency matters.
You don't want one unit looking noticeably smaller than another simply because the files came from different designers.
Once you've got your scale confirmed, make sure you get your orientation right, then start supporting!
Supporting the miniatures
I personally don't like auto supports through various programs. I use Lychee Slicer and I still manually support my minis. It's a lot of work, especially when you're potentially supporting 10–30 sculpts, or even more depending on the size of your army.
This particular project took me about 8 hours to support properly. But it's worthwhile.
With the way I support, it minimises the time spent on post-processing and support removal. Often, pre-supported minis can be way too firmly supported, which makes removing them considerably more difficult.
When you're printing a single miniature, that might not be a huge deal.
When you're printing an entire army?
It adds up very quickly.
Then it's off to the printers
Once all the prep work is done, it's off to the printers.
At the settings I use, it takes about 8–12 hours per tray, depending on the height of the miniatures.

I try to plan the trays around the models I'm printing as well.
I'll place all the large or tall models together if possible and keep the shorter ones together too.
That means I'm not waiting for one spear to finish printing while 99% of the tray is already done.
When you're printing a full army, this sort of planning makes a surprisingly big difference.
And this is where resin 3D printing really comes into its own for tabletop miniatures. The detail you can get from a properly prepared resin print makes it ideal for smaller models, characters and units where all those little details matter.
Don't forget the bases
While the resin prints are going, I'm getting my bases printed on the FDM printers.
A bit of planning and stocktaking means you can have everything you need, basing-wise, pretty much done in advance of the first set of resin miniatures finishing.
This is another part of printing a full army that can easily be overlooked.
It's not just the miniatures.
You've got the models, bases, supports, post-processing, cleaning, curing and eventually painting.
When you're dealing with dozens of models, having all of those pieces planned out beforehand makes the whole process much smoother.
Post-processing and getting them ready for the tabletop
Once the resin's done, post-processing goes through its usual course:
Dirty tank dunk.
Initial clean.
Remove supports.
Final clean.
Final cure.
Then it's off to the hobby bench to get some paint and get them ready for the tabletop!

And that's really the part I enjoy about doing projects like this.
You start with a bunch of digital files on a computer, spend a ridiculous amount of time researching, resizing, orientating and supporting them, and eventually you've got an entire 3D printed army sitting in front of you ready to paint.
Closing thoughts on 3D Printing a full army
Whether you're looking at Warhammer 40K 3D printing, Age of Sigmar 3D printing, or just wanting a collection of custom tabletop miniatures, there's a lot more involved than simply pressing print.
For a single model or supplemental unit, it's relatively straightforward.
For an entire army, there's a lot more planning involved.
And that's exactly where a good 3D printing service can make things considerably easier.
If you've already got the files and you're looking at having Warhammer models, units or an entire army 3D printed, that's something we can help with here at Useful 3D Prints.
You provide the files, and we can take care of the printing side of things, from preparing the models through to getting those miniatures off the printers and ready for your hobby bench.
Now, who's ready for their next army? Get in contact via our form here!


Comments